Masking XML files
This walkthrough explains how to mask an XML document.
You are going to build a package that loads the given XML file, performs masking on XML elements and creates a new file with applied masking.
| Table of contents |
|---|
| Preconditions |
| Loading and saving an XML file |
| Masking XML elements |
Preconditions
- BizDataX Package (Visual Studio project) is created.
- XML file prepared.
In this walkthrough we are going to use XML file with following content:
<?xml version="1.0" encoding="utf-8" ?>
<customers>
  <customer customerid="1" firstname="Orlando" lastname="Gee">
    <emailaddress>orlando0@gmail.com</emailaddress>
    <ssn>149362496</ssn>
    <phone>245-555-0173</phone>
  </customer>
  <customer customerid="2" firstname="Keith" lastname="Harris">
    <emailaddress>keith0@hotmail.com</emailaddress>
    <ssn>961-65-9945</ssn>
    <phone>170-555-0127</phone>
  </customer>
  <customer customerid="3" firstname="Donna" lastname="Carreras">
    <emailaddress>donna0@yahoo.com</emailaddress>
    <ssn>896-18-4813</ssn>
    <phone>279-555-0130</phone>
  </customer>
  <customer customerid="4" firstname="Janet" lastname="Gates">
    <emailaddress>janet1@gmail.com</emailaddress>
    <ssn>111-58-6594</ssn>
    <phone>710-555-0173</phone>
  </customer>
  <customer customerid="5" firstname="Kathleen" lastname="Garza">
    <emailaddress>kathleen0@gmail.com</emailaddress>
    <ssn>756525335</ssn>
    <phone>150-555-0127</phone>
  </customer>
</customers>
Loading and saving an XML file
In this part we will create simple package that only loads XML file and creates a new version of same XML file.
Load the XML file
- In order to load the XML file, we need a variable to load the file into. Open the Variables tab in the bottom of Package.xaml window (Figure 1). Click on Create variable. New row is added. Enter xml as variable name.
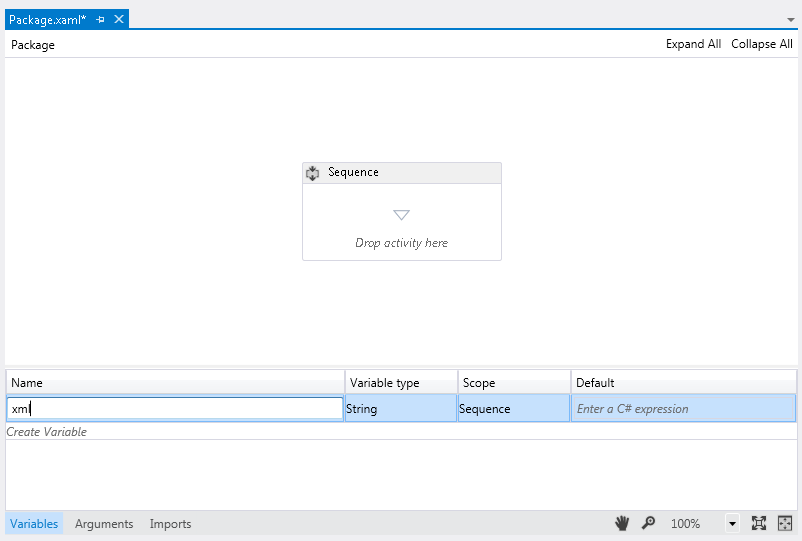 Figure 1: Creating a new variable in the Variables tab
Expand Variable type dropdown, and click Browse for Types (Figure 2).
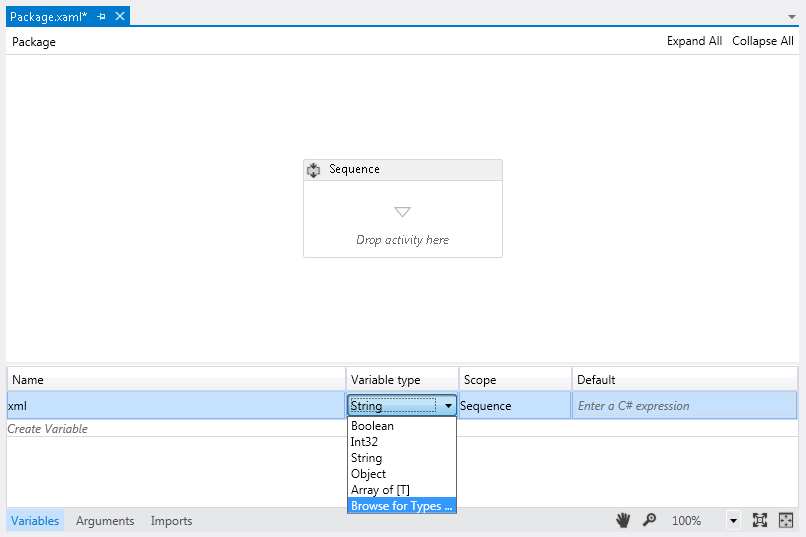 Figure 2: Browsing for the variable type
New window will open (Figure 3). Navigate to System.Xml.Linq -> System.Xml.Linq -> XDocument and click OK.
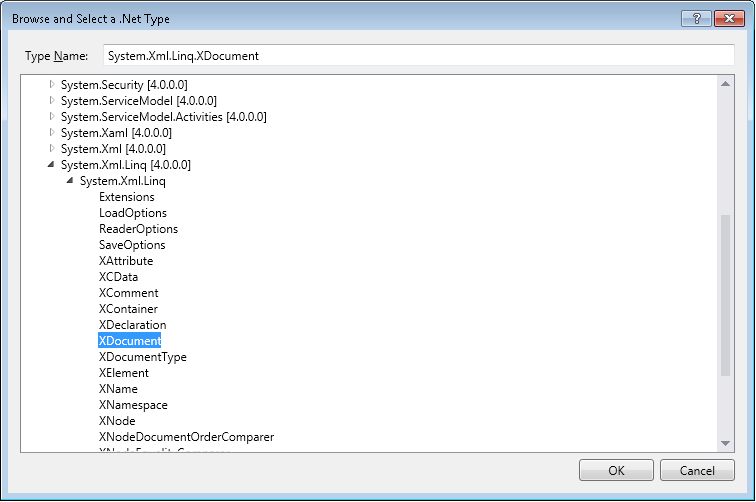 Figure 3: Selecting XDocument as the variable type
- Load xml file into variable.
Open the Toolbox. Find Assign tool under Primitives group. Drag and drop Assign tool into Package.xaml -> Sequence.
Enter xml as the variable in which to assign, and XDocument.Load(@"c:\temp\customersSample.xml") as the value to assign. Replace "c:\temp\customersSample.xml" with the path to your XML file.
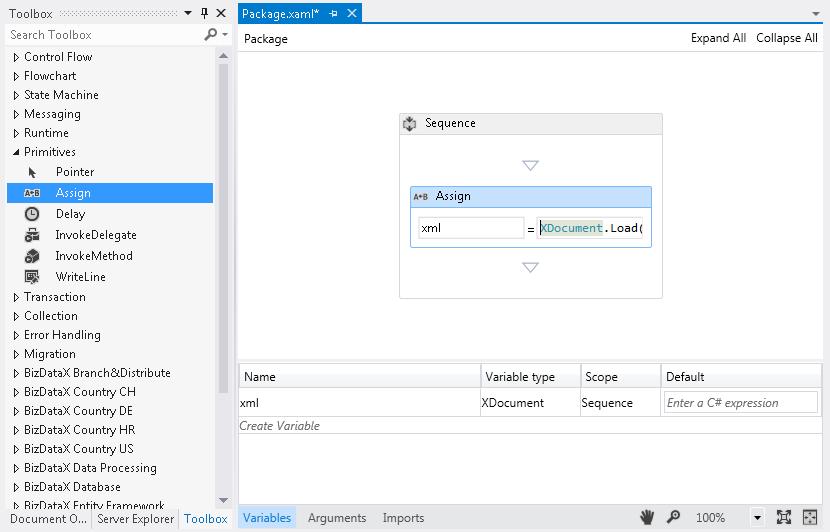 Figure 4: Loading the XML file into a variable
Save the new XML file
- Add a tool for saving the file.
Open the Toolbox. Find InvokeMethod tool under Primitives group. Drag and drop InvokeMethod tool into Package.xaml -> Sequence, below the Assign tool. (Figure 5).
Enter variable name xml under TargetObject, Save as the Method name, and leave TargetType as null.
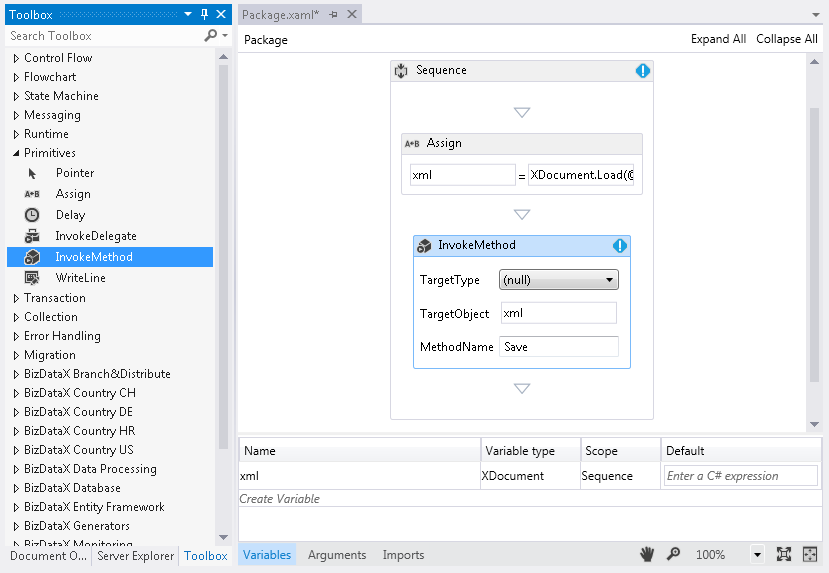
Figure 5: Adding the InvokeMethod tool for saving the file
- Define the new file name as the tool input parameter.
Select InvokeMethod tool in Package.xaml window, and open Visual studio Properties window. Click the browse button next to Parameters field. A window will open. Click on the Create argument. New row is created. Select In for Direction, String as Type, and enter @"c:\temp\customersSample_masked.xml" as the Value (Figure 6). Click OK.
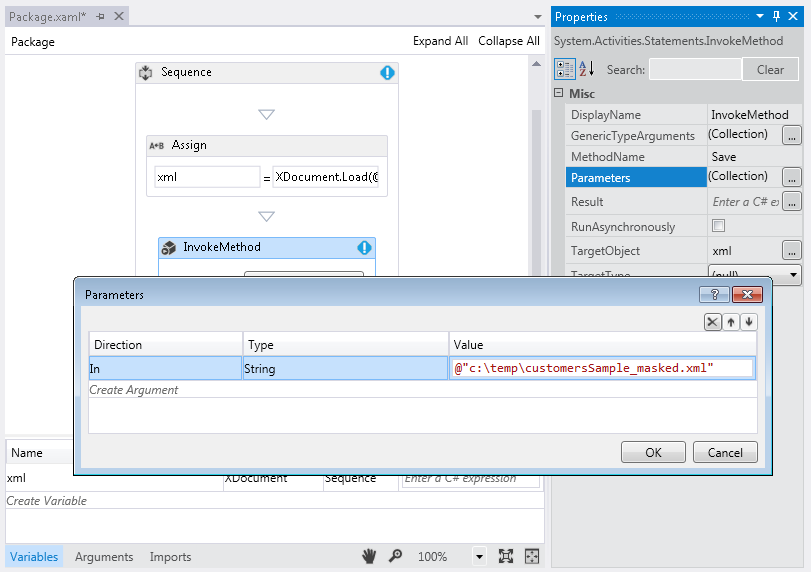 Figure 6: Parameters window
Execute package
- Build and run package.
- The build should be successful, and the package run should produce a new file on the defined location. The content of the file should be the same as the original XML file, because we still haven't defined any masking rules.
Masking XML elements
This part focuses on masking parts of the XML content.
Iterating through customers
- Add a masking engine.
Double-click on Package.xaml in Solution Explorer to open the package designer.
Open the Toolbox. Drag and drop Masking engine tool from BizDataX Data Processing group into Package.xaml -> Sequence, below the Assign tool and above the InvokeMethod tool like in the (Figure 7).
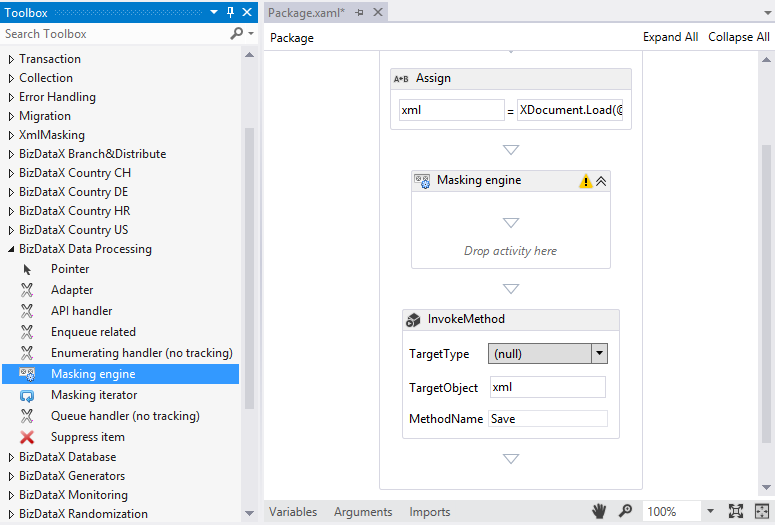 Figure 7: Adding masking engine
- Add masking iterator.
Open the Toolbox. Drag and drop the Masking iterator activity from the BizDataX Data Processing group into the Masking engine.
- When the Masking iterator is added, you will be prompted to select the type of entity to iterate over. Select Browse for Types, as displayed in Figure 8.
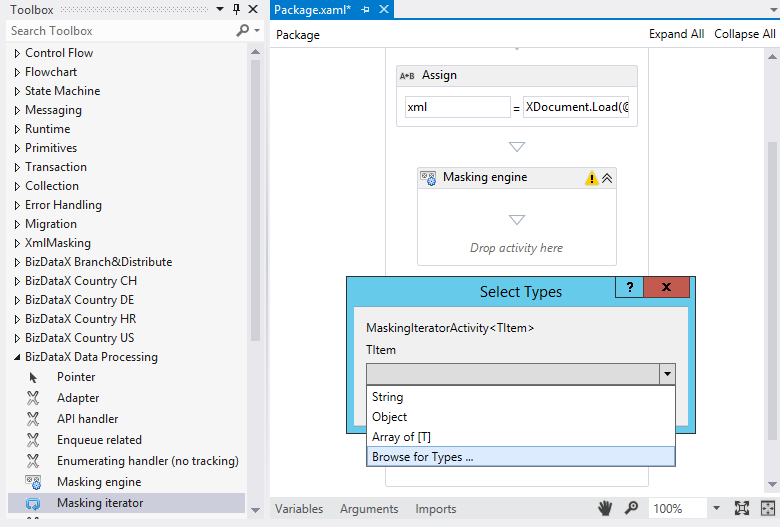 Figure 8: Adding masking iterator
- New window with types is opened (Figure 9). Navigate to System.Xml.Linq -> System.Xml.Linq -> XElement and confirm with OK.
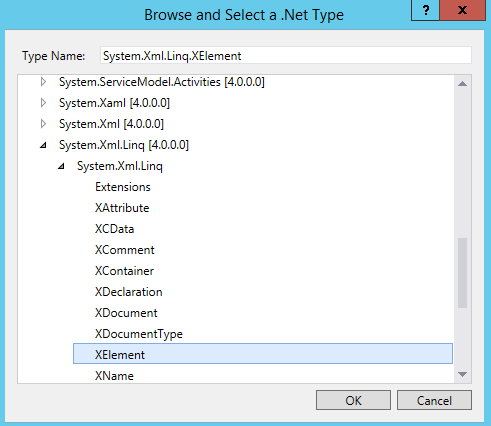 Figure 9: Browsing for type to iterate over
- Workflow should look like the one in Figure 10. Notice the Masking iterator user interface is divided into two areas: one for data handlers (Drop data handler here) and one for masking activities (Drop activities here).
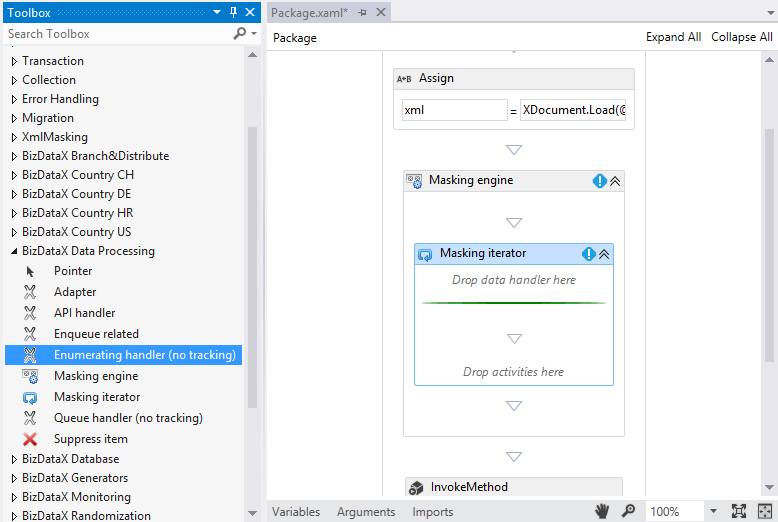 Figure 10: Added masking iterator
- Add Enumerating handler (no tracking).
Open the Toolbox. Drag and drop Enumerating handler (no tracking) tool from BizDataX Data Processing group into Masking iterator where it says "Drop data handler here".
Enter xml.Descendants("Customer") for the Items.
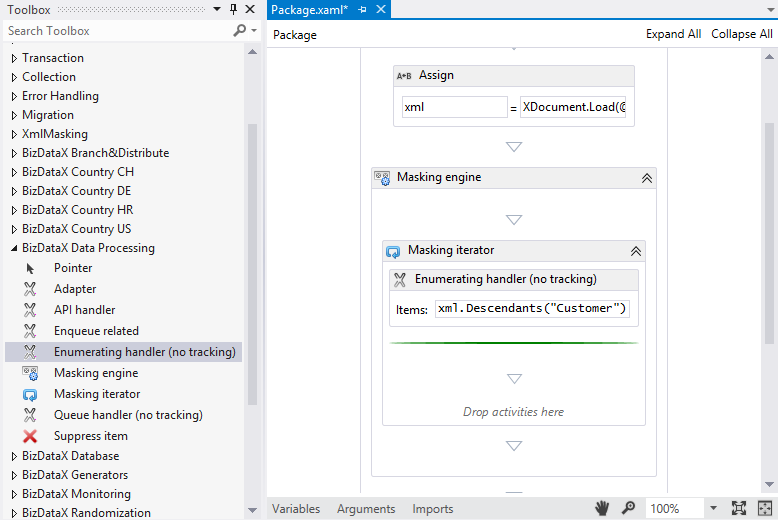 Figure 11: Added Enumerating handler (no tracking)
Mask xml element attribute
- Mask First name attribute.
Open the Toolbox. Drag and drop Pick CH first name from list tool from BizDataX Country CH group into Masking iterator where it says "Drop activities here".
Select (expression) for the Property field and check the checkbox next to it. A textbox will appear to enter the expression. Enter current => current.Attribute("FirstName").Value. Select FirstName for the replace with field.
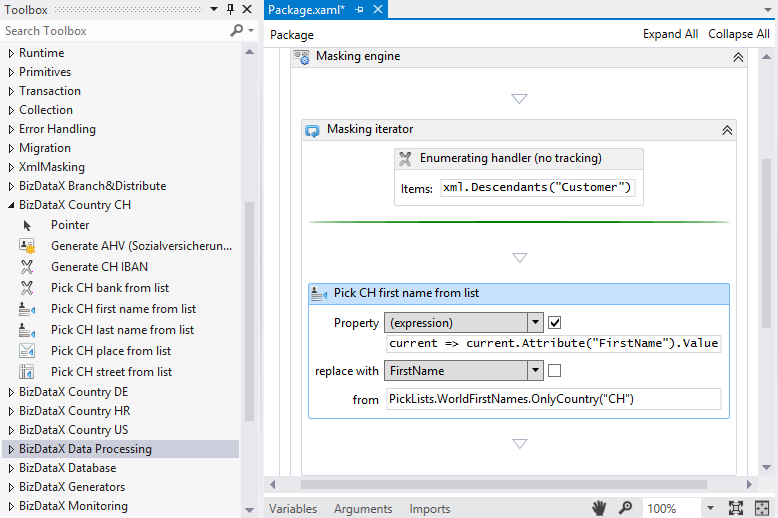 Figure 12: Masking first names
- Mask last name attribute.
Open the Toolbox. Drag and drop Pick CH last name from list tool from BizDataX Country CH group into Masking iterator below Pick CH first name from list.
Select (expression) for the Property field and check the checkbox next to it. A textbox will appear to enter the expression. Enter current => current.Attribute("LastName").Value. Select LastName for the replace with field.
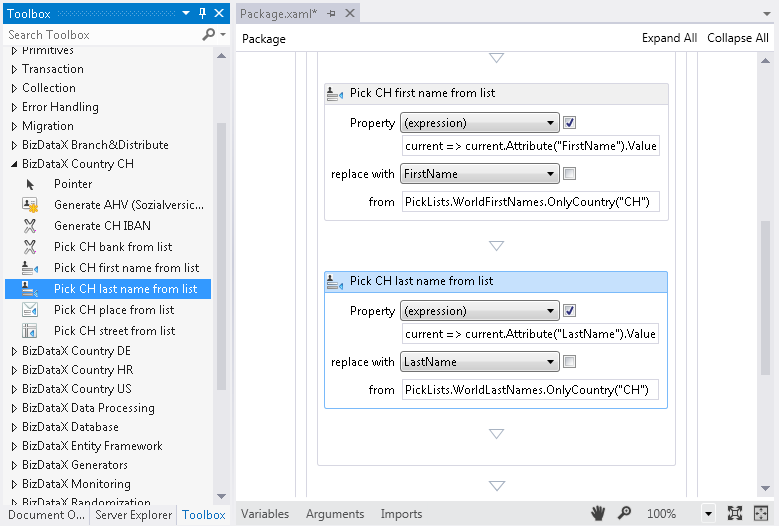 Figure 13: Masking last names
Mask xml element text content
- Mask email
Open the Toolbox. Drag and drop Evaluate text function(item) tool from Primivites group into Masking iterator below Pick CH last name from list.
Select (expression) for the Property field and check the checkbox next to it. A textbox will appear to enter the expression. Enter current => current.Element("EmailAddress").Value. For the value to replace with, enter current => current.Attribute("FirstName").Value + "." + current.Attribute("LastName").Value + "@email.com".
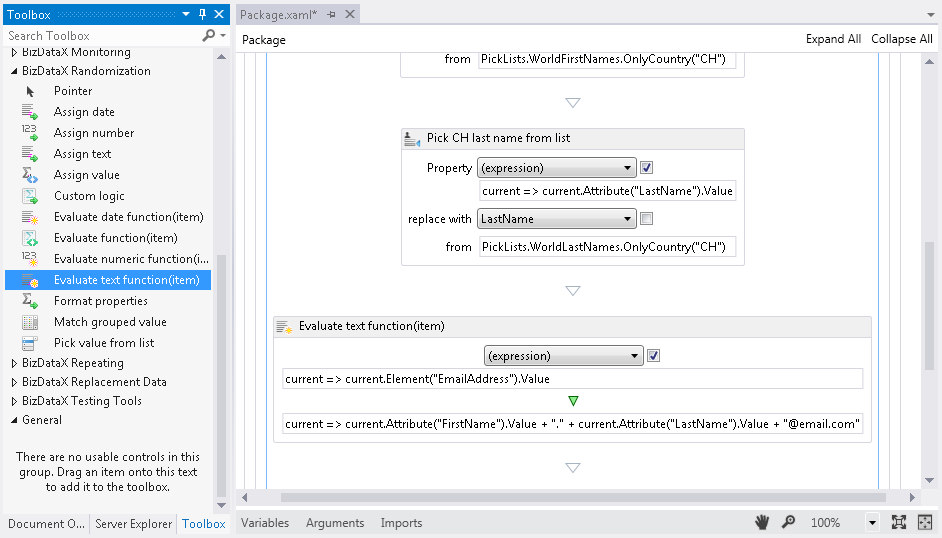 Figure 14: Masking email
The finished workflow should look something like the one in Figure 15.
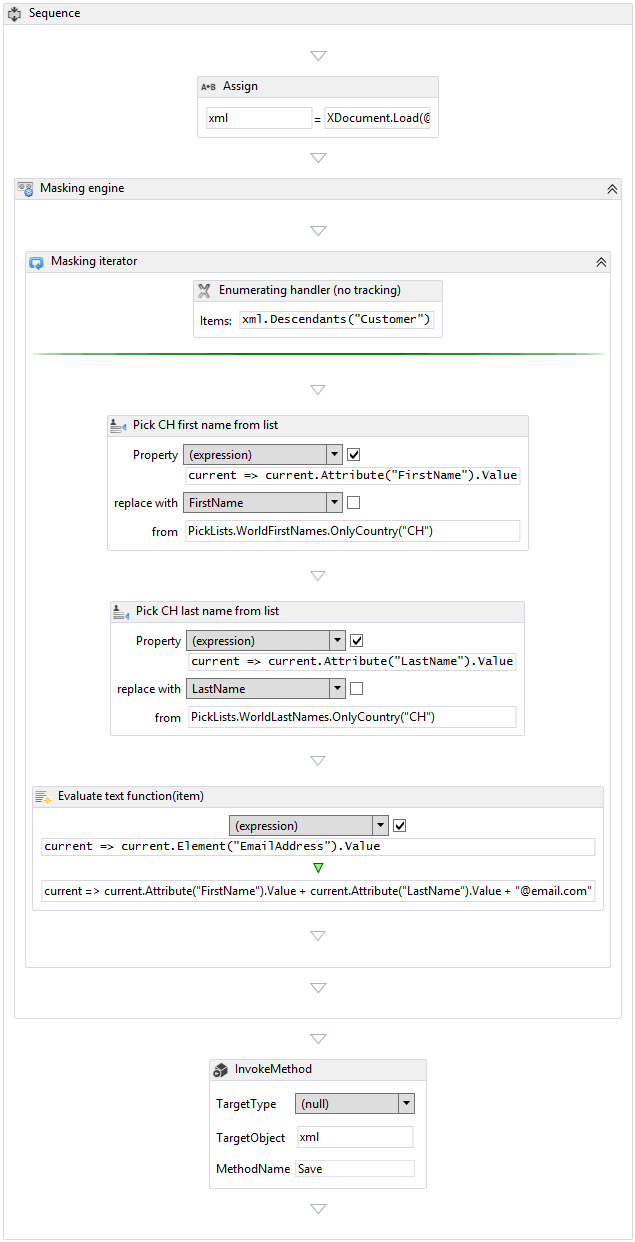 Figure 15: Finished workflow
Execute package
- Build and run package.
- The build should be successful, and the package run should produce a new file on the defined location. The content of the file should be changed, all the first names, last names and email should be masked.
<?xml version="1.0" encoding="utf-8"?>
<customers>
  <customer customerid="1" firstname="Andrea" lastname="Ladnier">
    <emailaddress>Andrea.Ladnier@email.com</emailaddress>
    <ssn>149362496</ssn>
    <phone>245-555-0173</phone>
  </customer>
  <customer customerid="2" firstname="Laurence" lastname="Glassey">
    <emailaddress>Laurence.Glassey@email.com</emailaddress>
    <ssn>961-65-9945</ssn>
    <phone>170-555-0127</phone>
  </customer>
  <customer customerid="3" firstname="Renke" lastname="Loosli">
    <emailaddress>Renke.Loosli@email.com</emailaddress>
    <ssn>896-18-4813</ssn>
    <phone>279-555-0130</phone>
  </customer>
  <customer customerid="4" firstname="Luciano" lastname="Leutzinger">
    <emailaddress>Luciano.Leutzinger@email.com</emailaddress>
    <ssn>111-58-6594</ssn>
    <phone>710-555-0173</phone>
  </customer>
  <customer customerid="5" firstname="Hieronyma" lastname="Matti">
    <emailaddress>Hieronyma.Matti@email.com</emailaddress>
    <ssn>756525335</ssn>
    <phone>150-555-0127</phone>
  </customer>
</customers>
Note: The values for first and last names in your file will be different because they're chosen at random.