- BizDataX
- Start guide
- Creating a data model (BizDataX Portal)
- Finding sensitive data
- Producing a specification
- Creating a new Visual Studio BizDataX project
- Creating a data model (BizDataX Designer)
- Creating a simple masking flow
- Publishing package to BizDataX Portal
- Executing package
- BizDataX Portal
- Installation guide
- User manual
- BizDataX Designer
- Installation guide
- Workflow
- Creating a new Visual Studio BizDataX project
- User interface elements
- Creating a data model
- Toolbox items
- Masking activities
- BizDataX Masking Control Flow
- BizDataX Country CH
- Generate AHV (Sozialversicherungsnummer)
- Generate CH IBAN
- Pick CH address from list
- Pick CH bank from list
- Pick CH company from list
- Pick CH first name from list
- Pick CH last name from list
- Pick CH place from list
- Pick CH street from list
- BizDataX Country DE
- Generate DE IBAN
- Pick DE address from list
- Pick DE bank from list
- Pick DE company from list
- Pick DE first name from list
- Pick DE last name from list
- Pick DE place from list
- Pick DE street from list
- BizDataX Country HR
- Generate HR bank account
- Generate HR BBAN
- Generate HR IBAN
- Generate JMBG
- Generate maticni broj
- Generate OIB
- Generate porezni broj
- Pick HR address from list
- Pick HR bank from list
- Pick HR company from list
- Pick HR first name from list
- Pick HR last name from list
- Pick HR place from list
- Pick HR street from list
- BizDataX Country US
- Generate US SSN
- Pick US address from list
- Pick US company from list
- Pick US first name from list
- Pick US last name from list
- Pick US place from list
- Pick US street from list
- BizDataX Data Processing
- BizDataX Database
- BizDataX Generators
- Generate and convert
- Generate and convert to number
- Generate and convert to text
- Generate business name
- Generate credit card number
- Generate date
- Generate date in range
- Generate fixed digit number
- Generate IBAN
- Generate items
- Generate items in random order
- Generate number in range
- Generate number sequence
- Generate numbered string
- Generate PAN
- Generate phone number
- Generate text
- Generate value
- BizDataX Monitoring
- BizDataX Pick Data From List
- Pick address from list
- Pick bank from list
- Pick company from list
- Pick first name from list
- Pick last name from list
- Pick place from list
- Pick street from list
- Pick value from list
- BizDataX Primitives
- API masking
- Assign date
- Assign number
- Assign text
- Assign value
- Clear value
- Evaluate date function
- Evaluate function
- Evaluate numeric function
- Evaluate text function
- Format properties
- BizDataX Repeating
- Assign repeating value
- Clear repeater
- Load repeaters
- Load single repeater
- Repeating of any value condition branch
- Repeating of boolean condition branch
- Repeating of date condition branch
- Repeating of number condition branch
- Repeating of text condition branch
- Save repeaters
- Save single repeater
- Set any repeating value
- Set boolean repeating value
- Set date repeating value
- Set number repeating value
- Set text repeating value
- Fluent Handler API
- Package steps
- Package parameters
- Publishing package to BizDataX Portal
- Package execution
- Masking-examples
- Logging
- Functions
- Custom code
- Picklists
- Addresses
- Banks
- Business suffixes
- Companies
- Domain names
- First names
- Last names
- Phone codes
- Places
- Streets
- Data generators
- Lambda expressions
- Synthetic data generation
- Repeaters
- Restartability
- File masking
- Advanced
- Supported data sets
- Oracle
- Oracle database analyzer
- Oracle database handler
- Repeaters persistence
- Restartability store configuration
- MSSQL
- MSSQL database analyzer
- MSSQL database handler
- Repeaters persistence
- Restartability store configuration
- DB2
- Informix
- Sybase
- Release notes
Creating a data model (BizDataX Designer)
The data model in BizDataX Designer is created based on the BizDataX Portal data model, or it can be a smaller data set, depending on what is selected from the BizDataX Portal.
The point here is to create a data model based on the data model from the Portal, which will contain what will actually be masked - schemas and tables containing columns with sensitive data found during discovery and defined within the specification.
| Table of contents |
|---|
| Import from the BizDataX Portal into the BizDataX Designer |
| Building a project |
Import from the BizDataX Portal into the BizDataX Designer
Once the environment is created on the BizDataX Portal, the creation of a data model can begin.
- To import data from the BizDataX Portal right-click the project in the Solution Explorer window and select the Import Portal Data option.
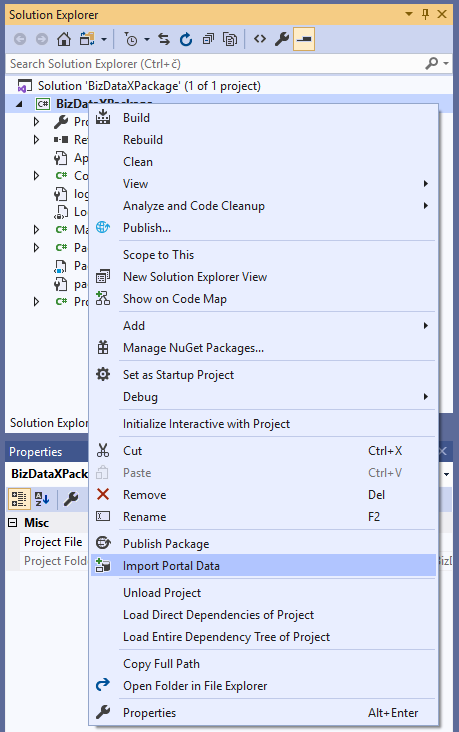
Figure 1: Import Portal Data
- On the Import Portal Data pop-up, all projects created on the BizDataX Portal are displayed. Select the project and click the Next button.
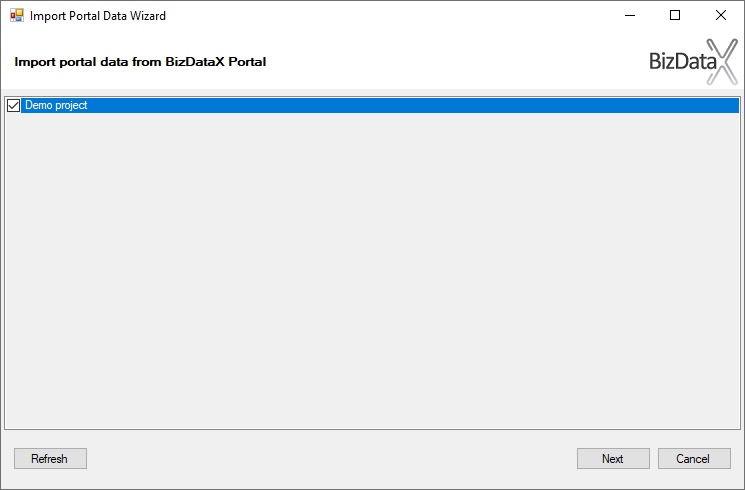 Figure 2: Import Portal Data - select the project to import
- On the Portal Data Selection, projects, data sources, schemas, tables, and columns of the selected project can be selected.
- The table node level uses different symbols for selecting a column to be imported,
and primary key columns will always have a yellow background.
By clicking on the checkbox next to the name of the column you can cycle through columns status symbols to choose how the column is going to be imported:
 the column will not be imported
 the column will be imported as read-only
 the column will be imported as a read/write column
Note: If more than one environment exists per data source, only the schemas, tables, and columns that exist in all environments could be selected for import.
- In this example, only CreditCard and Customer tables will be imported, as the columns FirstName from each were marked as columns with sensitive data that needs to be masked. Mark only these two tables. It is not a mistake to import everything, but it is not necessary.
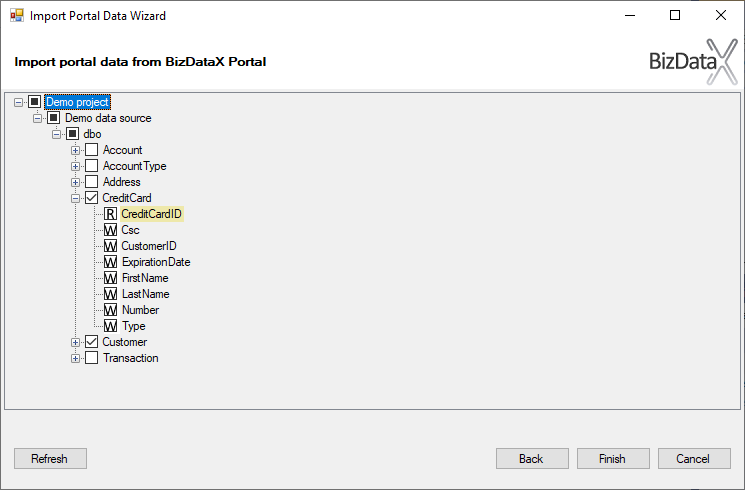 Figure 3: Import Portal Data - select schemas, tables, and columns to import
- To start the portal data import process, click the Finish button.
- If a Security warning dialog opens, click the OK button, since it warns about the start of a code generation process BizDataX Designer is executing.
- After the import is successfully finished, the BizDataXProjectData.xml file is added to the project, with nested T4 and CS files of the same name.
Note: installation of required NuGet packages (database handlers) is automatically performed as part of the import process and depends on the selected analyzer type. The Package Manager Console provides information about the successful completion of the installation. The installation and update of required NuGet packages can be done manually as well.
Building a project
- To finish creating a data model, build the project.
- after the project is successfully built, table activities that are going to be used when creating a masking workflow in one of the next steps of this guide can now be found in the Toolbox.
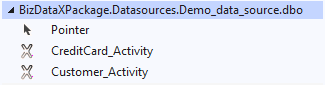
Figure 4: Created table activities
BizDataX Documentation © Built by Ekobit. All rights reserved.
https://www.ekobit.com/ https://bizdatax.com/ https://bizdatax.com/support/