- BizDataX
- Installation guide
- Requirements
- BizDataX Designer installation
- BizDataX Designer version upgrade
- BizDataX Designer advanced settings
- BizDataX Portal installation
- BizDataX Portal version upgrade
- BizDataX Portal advanced settings
- NuGet packages installation
- Start guide
- Creating a data model (BizDataX Portal)
- Finding sensitive data
- Producing a specification
- Creating a new Visual Studio BizDataX project
- Creating a data model (BizDataX Designer)
- Creating a simple masking flow
- Publishing package to BizDataX Portal
- Executing package
- BizDataX Portal
- User manual
- BizDataX Designer
- Workflow
- Creating a new Visual Studio BizDataX project
- User interface elements
- Creating a data model
- Toolbox items
- Masking activities
- BizDataX Masking Control Flow
- BizDataX Country CH
- Generate AHV (Sozialversicherungsnummer)
- Generate CH IBAN
- Pick CH address from list
- Pick CH bank from list
- Pick CH company from list
- Pick CH first name from list
- Pick CH last name from list
- Pick CH place from list
- Pick CH street from list
- BizDataX Country DE
- Generate DE IBAN
- Pick DE address from list
- Pick DE bank from list
- Pick DE company from list
- Pick DE first name from list
- Pick DE last name from list
- Pick DE place from list
- Pick DE street from list
- BizDataX Country HR
- Generate HR bank account
- Generate HR BBAN
- Generate HR IBAN
- Generate JMBG
- Generate maticni broj
- Generate OIB
- Generate porezni broj
- Pick HR address from list
- Pick HR bank from list
- Pick HR company from list
- Pick HR first name from list
- Pick HR last name from list
- Pick HR place from list
- Pick HR street from list
- BizDataX Country US
- Generate US SSN
- Pick US address from list
- Pick US company from list
- Pick US first name from list
- Pick US last name from list
- Pick US place from list
- Pick US street from list
- BizDataX Data Processing
- BizDataX Database
- BizDataX Generators
- Generate and convert
- Generate and convert to number
- Generate and convert to text
- Generate business name
- Generate credit card number
- Generate date
- Generate date in range
- Generate Email
- Generate fixed digit number
- Generate IBAN
- Generate items
- Generate items in random order
- Generate number in range
- Generate number sequence
- Generate numbered string
- Generate PAN
- Generate phone number
- Generate text
- Generate value
- BizDataX Monitoring
- BizDataX Pick Data From List
- Pick address from list
- Pick bank from list
- Pick company from list
- Pick first name from list
- Pick last name from list
- Pick place from list
- Pick street from list
- Pick value from list
- BizDataX Primitives
- API masking
- Assign date
- Assign number
- Assign text
- Assign value
- Clear value
- Evaluate date function
- Evaluate function
- Evaluate numeric function
- Evaluate text function
- Format properties
- BizDataX Repeating
- Assign repeating value
- Clear repeater
- Load repeaters
- Load single repeater
- Repeating of any value condition branch
- Repeating of boolean condition branch
- Repeating of date condition branch
- Repeating of number condition branch
- Repeating of text condition branch
- Save repeaters
- Save single repeater
- Set any repeating value
- Set boolean repeating value
- Set date repeating value
- Set number repeating value
- Set text repeating value
- Fluent Handler API
- Package steps
- Package parameters
- Publishing package to BizDataX Portal
- Package execution
- Masking-examples
- Logging
- Functions
- Custom code
- Picklists
- Addresses
- Banks
- Business suffixes
- Companies
- Domain names
- First names
- Last names
- Phone codes
- Places
- Streets
- Data generators
- Lambda expressions
- Synthetic data generation
- Repeaters
- Restartability
- Masking conditioned by data from related entities
- File masking
- Advanced
- Supported data sets
- Oracle
- Oracle database analyzer
- Oracle database handler
- Repeaters persistence
- Restartability store configuration
- Oracle database subsetting
- Microsoft SQL Server
- SQL Server database analyzer
- SQL Server database handler
- Repeaters persistence
- Restartability store configuration
- DB2
- Informix
- Sybase
- PostgreSQL
- Release notes
Masking CSV files
This walkthrough explains how to mask a CSV file by building a package that loads the given CSV file, performs masking and creates a new, masked CSV file.
| Table of contents |
|---|
| Preconditions |
| Masking activities that are going to be used |
| Steps |
Preconditions
- BizDataX Package (Visual Studio project) is created
- CSV file that is going to be masked is saved in
C:\Temp - Content of the CSV file must have the following format: first row must contain the file headers (e.q. "FirstName" and "LastName"), following rows contain data. Values can be separated by a comma, or any other character, in which case it's necessary to edit the handler content (the file used in this walkthrough can be downloaded here)
Masking activities that are going to be used
- Step
- Sequence
- Masking engine
- Masking iterator
- API handler
- Pick US first name from list
- Pick US last name from list
Steps
From Solution Explorer open the Code.cs file.
In Code.cs add class
Customerwith properties equal to the .csv headers.using System; using System.Collections.Generic; using System.Linq; using System.Text; namespace BizDataXPackage { /// <summary> /// Contains custom code to be used during package execution. /// </summary> public static class Code { // TODO: Add your code here } public class Customer { public String FirstName { get; set; } public String LastName { get; set; } } }Save your changes and build the project.
First few rows of the CSV file that is going to be masked:
FirstName,LastName
Tabatha,Beard
Lukas,Warner
Jessika,Luna
Breanna,Hess
Malik,Strong
Hilary,Stark
Shelbi,Bond
Trinity,Rush
From the Solution Explorer open the Package.xaml file.
Delete the workflow created by default.
Drag the Step activity from the Toolbox into the opened Package.xaml.
Drag the Masking engine from the Toolbox into the Step.
Drag the Masking iterator from the Toolbox into the Masking engine.
In the Select Types pop-up window select
Browse for Types...and findCustomer.Click OK on both pop-up windows.
Drag the API handler from the Toolbox into the Masking iterator, in the place that says "Drop data handler here".
In the API handler write
api=>api.Delimited().GetHandler<customer>("C:/Temp/Customers.csv","C:/Temp/Customers_masked.csv")Drag the Pick US first name from list masking activity from the Toolbox into the Masking iterator, where it says "Drop activities here".
In the Pick US first name from list masking activity, select
FirstNameas the "Property".Do the same for the Pick US last name from list masking activity (select
LastNameas "Property").Save your changes and start package execution (Debug->Start Without Debugging).
Open the
C:\Tempdirectory to check for changes. A new file named customers_masked.csv is created and it contains masked data from the original customers.csv file.FirstName,LastName Freddy,Monroe Allison,Ruiz Chad,Franklin Marisa,Riddle Nolan,Carney Jerrica,Flynn Alejandro,Bray Priscilla,Galloway
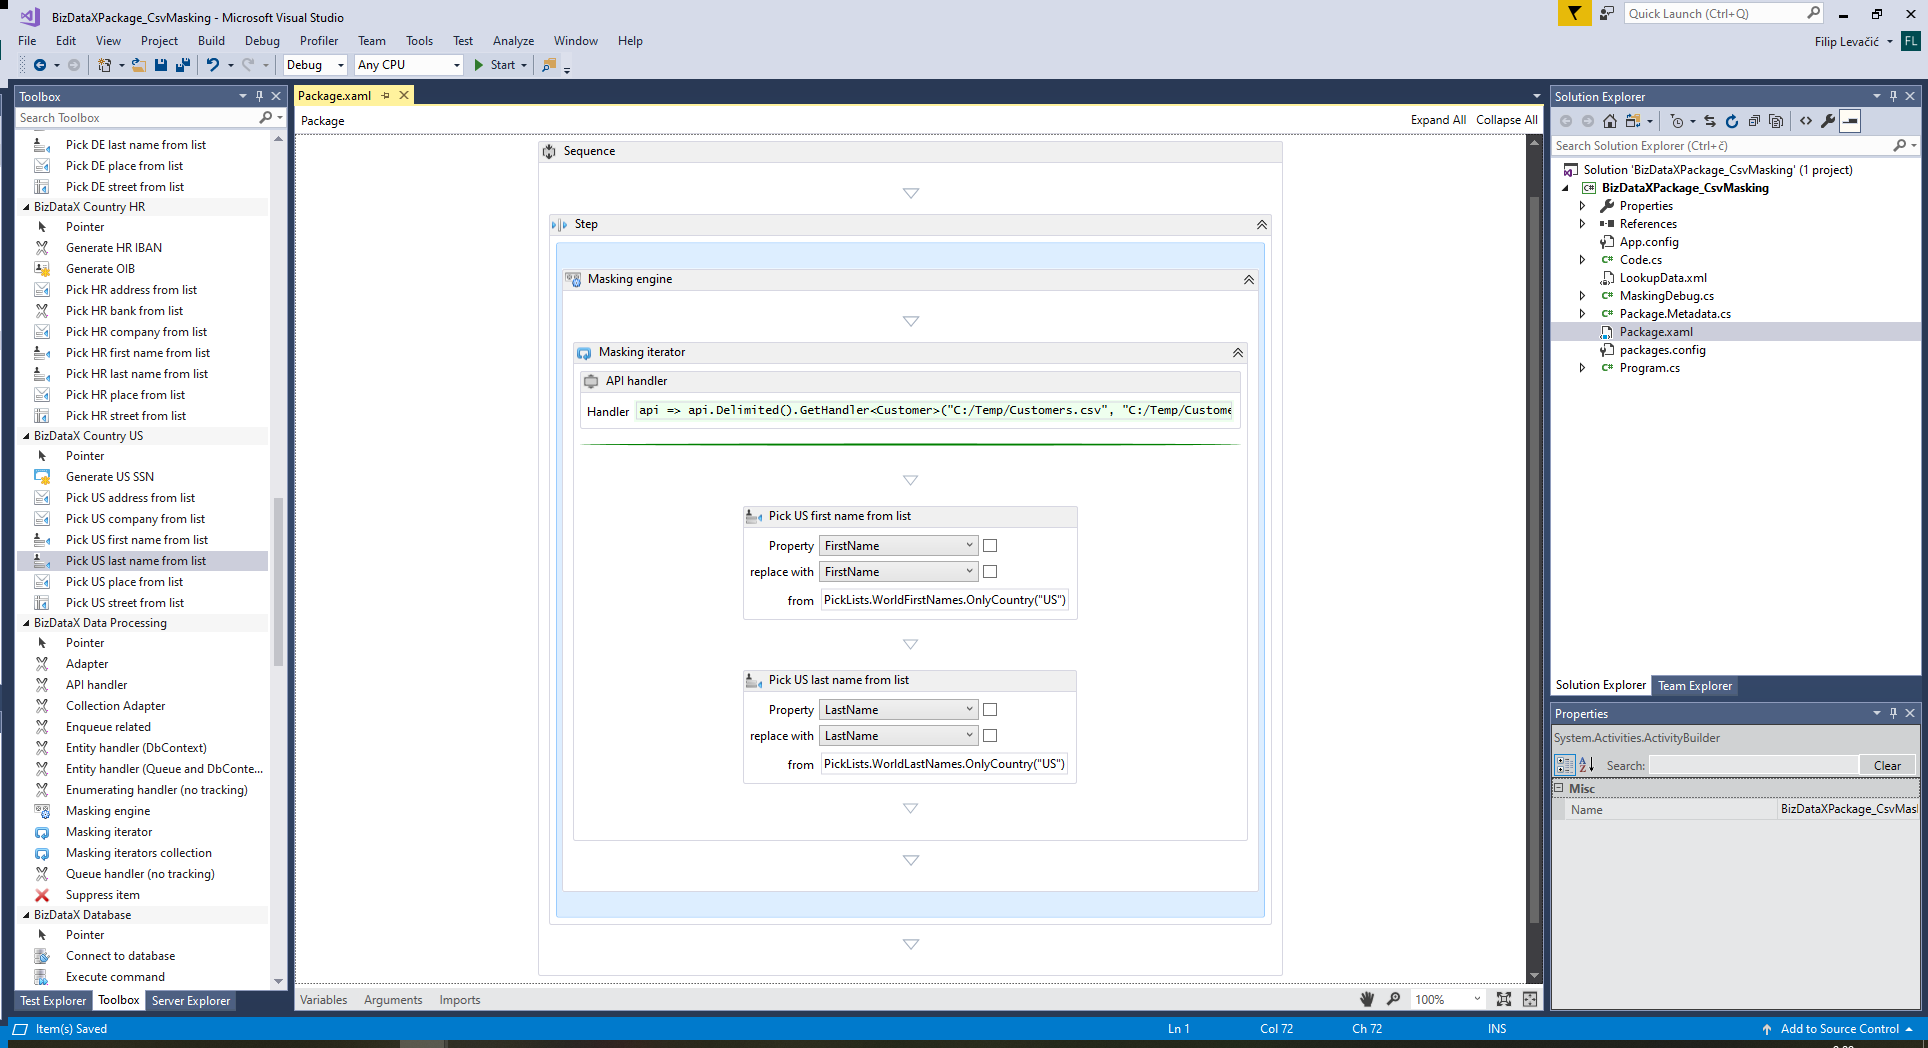 Figure 1: CSV file masking
Note: API Handler can be configured with additional options (custom delimiters, different encodings, etc):
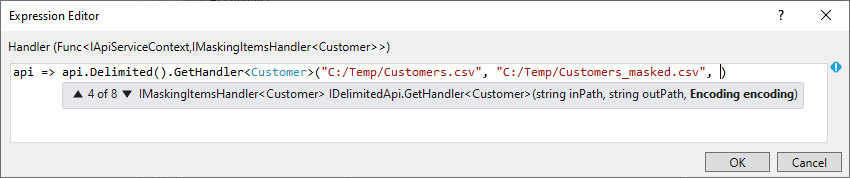 Figure 2: API handler options
BizDataX Documentation © Built by Ekobit. All rights reserved.
https://www.ekobit.com/ https://bizdatax.com/ https://bizdatax.com/support/